Writing a Custom Map-State for Storm Trident

One of Storm’s common uses is in doing real-time ETL – where a topology performs some processing on a stream and persists state to an external data store. Often, the state being stored is a map-state, where we perform a grouping and aggregation on the stream and keep track of the results in a map-like data structure. An example of this would be consuming a stream of page visits, splitting the stream by user ID and performing a count operation – maintaining a map containing a real-time count of the number of pages each user has visited.

When using Storm, there is a choice to make around whether to use core Storm or Storm Trident. Trident is an abstraction on top of Storm which adds some additional capabilities (and complexity). The additional complexity means that for performance-critical applications, Trident is usually not a suitable choice – however there are a few good reasons to choose Trident:

  • Trident takes a micro-batching approach to stream processing, meaning we can make use of optimisations involving bulk reads and writes to external data stores.
  • Trident has built in abstractions for maintaining state in a fault-tolerant way. We could implement our own way of maintaining state on top of core Storm, but Trident provides this out-of-the-box.
  • The state abstractions support maintaining different types of state, such as transactional or opaque (discussed later). This is good when you need exactly-once tuple processing or guarantees beyond core Storm’s at-least-once guarantee.
  • Trident provides a nice API on top of Storm, for partitioning streams, performing aggregations and groupings, and persisting state.

Here’s what our earlier example might look like, as a Storm Trident topology:

An interesting part of the Trident API is how state is persisted, via the call to persistentAggregate. In the example above, we instruct Trident to perform an aggregation on the stream – counting the number of tuples for each userId and store the results.

There are three arguments to persistentAggregate:

  • A state implementation – a class that acts as a factory for building Trident states. In the example, the call to persistentAggregate comes immediately after a groupBy operation. Trident recognises that we are operating on a grouped stream and therefore expects a state implementation that implements the MapState interface.
  • An aggregator – in this case Count. The aggregator simply defines a state to assign to every observed tuple (in this case, 1) and a function for combining two states (in this case, performing addition).
  • Output fields – if a new stream is derived from the aggregation, the values of the state are output as a tuple with the fields defined here. In our example, the count aggregator produces a count, so we output this as a single field, count. Since we are operating on a grouped stream, the output tuples in the derived stream will contain two fields: userId and count

Trident is often demonstrated with the MemoryMapState – a map-state implementation which stores all state in memory. In practice, you usually want to persist state to a non-volatile, fault-tolerant store. If your choice of data store doesn’t already have a Trident state implementation, you may have to write one yourself. The rest of this post will show what’s required to write your own Trident map-state, with examples from a map-state implementation that I wrote for Aerospike, a distributed key-value store.

Most map-state implementations in Trident provide three ways to store and update state, each of which yields different processing guarantees:

  • Non-transactional – No processing guarantee. In this case the map-state will store only the latest result for each key, for example a count.
  • Transactional – Exactly once processing guarantee, as long as the spout is also transactional. This means that the spout guarantees that every tuple appears in exactly one batch, and two batches with the same ID will always contain the same tuples. In this case the map-state will store the latest result for each key, along with a batch ID corresponding to the batch of the most recent update.
  • Opaque – Exactly once processing guarantee, as long as the spout is also opaque. This means that the spout guarantees that every tuple is processed at least once, although a tuple may fail in one batch and then succeed in a later batch. In this case the map-state will store the latest result for each key, a batch ID corresponding to the batch of the most recent update and finally the previous value for the key.

Of course, transactional or opaque states are usually desirable, as they can provide exactly-once processing guarantees. They store additional information for each key, so the tradeoff comes with using more space. The fault-tolerance logic for these three types of map-state are the same for any implementation and Trident conveniently provides wrapper classes for each, which will wrap an underlying backing map with the fault-tolerance mechanics. We just need to implement the IBackingMap interface, and provide the logic for doing batch reads and writes to our underlying datastore. Here’s how this might look:

In this example I’ve wrapped the backing map with Trident’s CachedMap implementation, which caches writes in-memory. This improves read performance and reduces load on our underlying data store, especially if it is likely that the same key will be updated multiple times within a short time period.

Implementing the multiGet and multiPut methods of IBackingMap is where the bulk of our logic goes. This is where we write our custom logic to interact with our underlying data store and perform batch reads and writes. Typically, multiPut would iterate over the keys in the batch, construct a batch write request, and finally perform a batch write. In my case, Aerospike does not support batch writes, so I had to perform a write for every key:

The last piece is to define a way serialize the values to and from your underlying data store. Note the reference to serializerHelper above – this helper contains functions to map between Trident values and values that the Aerospike client expects. I wrote a serializer for non-transactional, transactional and opaque states, which define mappings for Object, Trident’s TransactionalValue, and Trident’s OpaqueValue respectively:

That’s it – we are now ready to try out our new state implementation. In summary, the steps we followed were:

  1. Implement IBackingMap to do multiGets and multiPuts to the underlying data store
  2. Write serializers for each of the three state value types
  3. Wrap our IBackingMap implementation with one of Trident’s map implementations, providing the appropriate serializer

Trident will handle the tricky fault-tolerance logic, and we can sit back and enjoy the processing guarantees 🙂

Multivariate A/B Testing with Dependent Experiments

This is a continuation of my previous post on implementing a generic A/B testing service – here I will discuss the intricacies around one of the biggest problems faced: the problem of supporting multiple simultaneous experiments, some of which may influence the outcomes of others. The solution discussed here is based on Google’s approach to A/B testing.

Allowing a user to be in more than one experiment
One of the first issues to address is when it is acceptable for a user to be in two experiments at once. Of course, if we have several experiments testing the same thing (e.g. in the advertisement use-case, where there are several statistical models and we want to find out which one yields the highest click-through rate), then any given user can only be in one of those experiments. On the other hand, if we have two unrelated experiments which are testing completely independent features, then it’s fine for a user to be in both experiments at the same time.

We need a way to define and represent experiments in a way that would enable us to capture the different semantics between similar and independent experiments. For this, we borrow Google‘s terminology:

  • Layer – A layer represents a specific type of A/B test. For example, we may have a layer for representing the A/B testing of statistical models used for boosting click-through rates.
  • Experiment – An experiment lives within a parent layer and each experiment represents a specific test. For example, we may have an experiment for testing model #5.

These terms are depicted more clearly in the diagram below, which shows an A/B testing configuration for two independent features.

Example depicting A/B testing terminology

Now, it becomes clear when a user can participate in multiple experiments. Within each layer, a user can only be in one experiment but across layers, this constraint does not apply. Now we just need a way to assign users to an experiment within each layer.

Ensuring that traffic is always allocated fairly

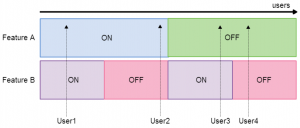
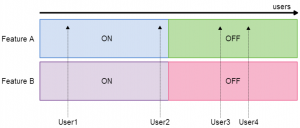
When users are being assigned to multiple experiments, it is easy to allocate traffic (i.e. mapping users to expeirments) in a way that is unfair and leads to biased and unmeaningful results. Consider our two independent features scenario and imagine that users are distributed horizontally across the diagram:

Unfair user allocation for two independent features

Here, we can see that if a user is assigned the experiment Feature A: On, they will also be assigned Feature B: On. So, if we later analyse the KPIs for the purple users vs the red users, we will have no idea whether any change in the KPIs has come from Feature A or Feature B. We need to allocate traffic in a fair way:

Fair user allocation for two independent features

Here, the users assigned Feature A: On are equally split over Feature B: On and Feature B: Off. Now, if we look at the KPIs for the purple users vs the red users, we know that any change we see is purely down to Feature B. We have achieved this by partitioning experiments within each layer equally across experiments within the other layer.

In this simple example, where we only have two layers and two experiments within each layer, with a 50/50 traffic split, the partitioning solution is simple. However, our generic service needed to be able to handle scenarios where there are potentially many layers and many experiments within each layer, with arbitrary traffic splits. To solve this, we took another approach. Instead of ensuring experiments are partitioned fairly and then assigning a user to a fixed position across all layers, we randomly assign users to a position within each layer. To build the logic behind this, we introduce a new concept:

  • Bucket – A layer is split into many buckets and a bucket maps to a single experiment. This is used in traffic allocation: a user is assigned a bucket and that bucket determines which experiment they land in.

As long as users are uniformly distributed across the buckets in each layer, and there is no dependence between the assignments in one layer and the assignments in another, then we will end up with a fair allocation but with much simpler logic than the experiment partitioning approach would require. We also must ensure that any given user is always assigned to the same bucket within each layer – we don’t want users to end up in different experiments in subsequent requests. Effectively, we need a random but deterministic mapping from users to buckets which is independent between layers.

To achieve this, we concatenate the user’s ID with each layer ID, and then use a hash function to map the user to a bucket within each layer:

As long as we use a good hash function and choose a power of two for our number of buckets (see this stackoverflow post for an explanation), this will give the random but deterministic mapping that we need. For four users, we may end up with a mapping that looks something like this:

Bucket allocation for two independent features, by hashing user_id and layer_id together

Configuring experiments with eligibility criteria

Another requirement for our A/B testing framework was to enable experiments to have some kind of eligibility criteria which cause the experiment to only be active under certain conditions. This means associating a set of attributes with the experiment. For example, the attributes {“country”: “UK”, “gender”: “male”} indicate that a user is only eligible for an experiment if they are male and live in the UK. If a user lands in an experiment that they are not eligible for, we give them the ‘default experience’, and to avoid introducing bias that user’s data is discarded and not considered when calculating KPIs.

When using the layer model and eligibility criteria are involved, there are situations where we can introduce new layers for the purpose of minimizing the amount of data discarded. For example, say that we want to test Feature A only in the UK and Denmark. We could define a layer with four experiments, like this:

Eligibility criteria – a poorly defined configuration

This works and adheres to our original definition of a layer, however this configuration results in some traffic being discarded unnecessarily. For example, if a UK user lands in a Denmark experiment, they will be given the default experience but will not participate in an experiment. This is clearly not optimal – only 50% of UK and DK users will participate in an A/B test. To avoid this wastage, we can simply use two layers instead of one:

Eligibility criteria – a well defined configuration

Defining multiple layers in this way is acceptable whenever the users eligible for each experiment are disjoint. If this was not the case in the above example, then we may end up with a conflict: a user could be assigned ON in one layer and OFF in another. If we wanted to add another A/B test, testing Feature A on all male users, then we would have to define all experiments in a single layer as there is some overlap in eligible users.


As we’ve seen, A/B testing can become fairly complex when running multiple simultaneous experiments and there are some subtle issues that must be addressed in order to ensure that experiments are fair, meaningful and optimally allocated to minimise wasting valuable traffic. For a tech company, A/B testing has enough complexity to warrant building it as an isolated service, enabling you to have powerful A/B testing functionality across a range of applications without needing to deal with the same problems in multiple projects.

Implementing a Generic A/B Testing Service

The ability to do A/B testing has become a key requirement of many tech driven companies. Without the ability to run meaningful A/B tests, how can we know for sure that changes and new features are resulting in the improvements that we anticipate? Here are a few examples of how A/B testing is used:

  • A social network, changing the number of required fields on their registration webpage and monitoring how it affects the percentage of visitors who register
  • An e-retailer, making a change to the way products are ordered by an e-commerce search engine and monitoring how it affects the number of product orders attributed to search
  • An advertiser, comparing statistical models used in placing advertisements and seeing which model leads to the highest click-through rate

In fact, any product which involves user interaction can be A/B tested to ensure that changes or new features are having a positive effect on relevant key performance indicators (KPIs).

In this post, I will discuss the motivation and benefits of implementing A/B testing as a generic service, to be shared and used throughout an organisation.

Consider the most simplistic implementation of A/B testing.
This will typically involve splitting the users of an application into two equal halves and then giving each of the two user groups a different experience. This could be achieved by adding some simple logic inside your application:

Here, we take the integer hash code of a user’s ID and apply modulo 2. Then, if we get an even number, give the user experience A and if we get an odd number, give the user experience B. We can store or log the experience given to each user and later compute some KPIs for the ‘odd’ users and the ‘even’ users and compare the two user groups.

This implementation should work fine, but in practice, there are a number of other things that are usually required from an A/B testing framework:

  1. Be able to disable a live experiment, or change the traffic allocation.
    For example, you might want to give just 1% of users a new feature and verify that it’s working as expected before ramping the traffic allocation up to a 50/50 test. In our simple implementation, the traffic allocation is hard-coded into the application, so we’d have to redeploy every time we make a change. Of course, we could use a database to store experiment configuration and make it possible to change the configuration while the application is running, but this is a lot more work to implement and requires you to maintain a database.

    Another concern here is around how you later perform your KPI analysis. Imagine a traffic allocation change being made to a live A/B test, at a certain point in time:

    Scenario where a traffic allocation change is made to a live A/B test.
    Scenario where a traffic allocation change is made to a live A/B test.

    When you perform KPI analysis to compare your experiments, it’s acceptable to perform the analysis before the change was made, or after the change was made, but not across the time of the change. This generally applies to any type of change – changes will affect your KPIs in some way and your results will not be meaningful if you analyse your experiments across the time when a change was made. It would be good if our A/B testing logic had some way of enforcing meaningful analysis.

  2. Have experiments with multiple parameters.
    In example above, there is just one parameter: a boolean indicating whether the new feature should be turned on or off. But it’s possible that you might want to have an experiment with many parameters, and these parameters may have different types. Hard-coding these parameters into your application will quickly become messy and hard to organise.

  3. Have multiple experiments running at the same time.
    Things can get tricky when you want to run multiple experiments at the same time. When is it OK for a user to be in two experiments at once? Of course, if you have several experiments testing the same thing (such as in the advertiser use case mentioned earlier, where there are several statistical models and you want to find which one yields the highest click-through rate), then a user can only be in one of those experiments. On the other hand, if you have two unrelated experiments which are testing completely independent features, then it’s fine for a user to be in both experiments at the same time.

    There are further complexities around how to allocate traffic fairly when users are being assigned to multiple experiments. Consider the case where we are A/B testing two new, independent features. For each feature, we want to find out whether it’s better to have that feature enabled or disabled. The scenario is depicted in the below image:

    A/B testing two independent experiments simultaneously, with an unfair traffic allocation scheme.
    A/B testing two independent experiments simultaneously, with an unfair traffic allocation scheme.

    Here, if you imagine that users are distributed horizontally across the diagram, then drawing a vertical line anywhere on the diagram would represent a single user’s experience. Here, if a user is assigned the experiment Feature A: On, they will also be assigned Feature B: On. So, if we later analyse the KPIs for the purple users vs the red users, we will have no idea whether any change in the KPIs has come from Feature A or Feature B. We need to allocate traffic in a fair way:

    A/B testing two independent experiments simultaneously, with a fair traffic allocation scheme.
    A/B testing two independent experiments simultaneously, with a fair traffic allocation scheme.

    Here, the users assigned Feature A: On are equally split over Feature B: On and Feature B: Off. Now, if we look at the KPIs for the purple users vs the red users, we know that any change we see is purely down to Feature B.

    In this example, the solution is quite obvious, but what if we are testing many more features simultaneously – some of which have more than two variations. We need a way to ensure traffic is always allocated fairly, in any situation.

  4. Introduce segmentation logic.
    This is where you want your experiments to behave differently depending on the situation. For example, you might want an experiment to only be applicable to users from a certain country. Again, if you are writing your own A/B testing logic, this is more work for you to implement in your application.

  5. Validate experiments before they go live.
    In particular, this applies in the case where your experiments have many parameters of different types. There’s always the possibility of human error when you are configuring or making changes to an experiment. It would be nice to have a way to validate experiment configuration and ensure we are setting the right parameters with the correct types.

Implementing all of these features is a lot of work – and certainly not something you want to repeat in every application you develop that has some form of A/B testing requirement. A nice solution is to build an A/B testing service which handles things like storing experiment configuration, validation, segmentation, running multiple experiments simultaneously and allocating traffic fairly. Such a service could be used in two ways:

  1. By people: to define, configure and manage experiments
  2. By an application: to retrieve a set of parameters for handling a specific request

This can be hugely beneficial for anyone building an application that wants to do A/B testing. Instead of implementing a load of A/B testing logic in your application, your application just needs to make a single call to a service – effectively asking the question ‘what experience should I give this user?’. With this design, a client application just needs to pass a userId (or some other data element to use to split traffic into experiments) and a set of attributes which may be used for segmentation (for example, country=denmark might be an attribute). The client will then receive a response with a set of parameters which it can use to determine what experience to give the user. Using our earlier example, the response parameters would consist of something like featureEnabled=true. No other A/B testing logic needs to be implemented in the application itself!

Having a generic A/B testing service clearly brings many benefits when you have multiple applications that need this type of functionality. But, there is a notable drawback to the scheme described above which I came across when building an A/B testing service to be used in my organisation. This design assumes that it is feasible to make a request to a separate service for every request processed by the application. There are two potential issues with this assumption: the first being that in super-low latency applications, adding a couple of milliseconds to the response time may be unacceptable, and the second being that in high-load applications, the volume of requests may be too high for it to be feasible to call an external service on every request.

We hit the second issue – as we have an application which handles hundreds of thousands of requests per second and it wasn’t feasible to give the A/B testing service enough resource to handle that kind of volume. Our solution was to allow this application to download experiment traffic allocation instructions periodically from our service and implement some additional A/B testing logic in the application. This solution is not as clean as the call-on-every-request approach as it requires more work in the client application, such as segmentation logic, but the application still benefits from the service handling configuration storage, validation and traffic allocation.

For a more detailed description of the logic behind handling multiple simultaneous experiments, check out my next post (originally published on the Adform engineering blog). I also recommend reading this paper from Google, which the ideas in this post are based on.

Modern Database Access with Scala and Slick

Over the last few weeks I have been writing my first Scala application – a RESTful service backed by a SQL database for persistent storage. After some googling around the ‘Scala way’ to interact with a SQL database, I came across a modern database access library for Scala, called Slick.

Slick is a really clever library. Not only does it provide you with a way to perform operations on database tables by writing familiar Scala code – in the same way that you would perform operations on Scala collections – but, it also lets you do this in a type-safe way. Effectively, Slick is compiling Scala code to SQL. Consider a simple SQL query which selects a row by ID:

With Slick, we can use the familiar filter and map methods to write this query – it’s just like we are using the Scala collections API:

There is a key difference – if users were a normal Scala collection, then we would probably observe that _.userId has type Int, the literal 10 has type Int and _.username has type String. But here, users is not a Scala collection, it is an instance of a Slick table query. And we don’t actually have Ints and Strings to use in our filters and maps, since we are building a query that has not yet been executed. So what types are we actually using?

To achieve type safety, behind the scenes Slick is ‘lifting’ types into its own parameterised type, called Rep. From our table model, Slick knows that the userId column stores integers, so the type of _.userId is Rep[Int]. This can be read ‘representation of Int’. Since the === function on Rep[Int] expects another Rep[Int], an implicit function is used to ‘lift’ the plain literal 10 into a Rep[Int]. If we try to compare _.userId with something that cannot be converted into a Rep[Int], then the compiler will complain. This is how Slick provides a type safe DSL for writing database queries. Similarly, the type of the username column has type Rep[String] and so if we run this query we will get back a result of type String.

This really demonstrates the power and extensibility of the Scala language, as it simply isn’t possible to achieve the same thing in other languages. Something similar has been done before by Microsoft, with LINQ for C#. However, Microsoft didn’t achieve LINQ by using the C# language itself; they had to build the functionality into the C# compiler.

While this feature of Slick really stands out, there are many other reasons to use the library:

  • Full support for all popular SQL implementations
  • Handling of sessions and transactions. You can plugin a connection pool implementation such as HikariCP
  • Protection against SQL injection. When using plain SQL, all parameters are converted to SQL bind/substitution variables
  • An asynchronous API for performing database operations

The asynchronous API has been introduced very recently in Slick 3 and has seen Slick move away from a blocking API and instead towards an API which leverages Scala futures. This was perfect for my application, a RESTful web service written on top of Spray – a toolkit for building services based on REST/HTTP. A Future[Response] could be returned back to my request handling logic and Spray’s in-built marshaller for futures will delay marshalling until the response becomes available, at which point it can be marshalled by another thread.

As you might expect, with Slick you can build more complex queries or sequences of database operations using Scala’s for-yield construct. It turns out there are a few ways to do this – you can build queries by composing in either Query, DBIOAction or Future itself and at first I wasn’t sure when to use one over the other.

Composing in Query
When you compose in Query, Slick generates just one SQL statement. For this reason, this approach should be used wherever possible. In the example below, we perform a (implicit) join between a users and purchases table to find all purchases for a specific user.

Composing in DBIOAction
In Slick, a DBIOAction corresponds to a single database operation. Composing in DBIOAction results in multiple SQL statements, but just one database connection is used to execute them. This is particularly good if you have a sequence of dependent database operations that you want to execute transactionally. You can compose in DBIOAction and use Slick’s .transactionally method to execute the queries in a single transaction. This means that if any one of the queries fails, all prior operations will be rolled back – leaving the database in a consistent state. In the example below, we insert a user and then use the ID returned by this insert operation to insert a sequence of purchases, all in a single transaction.

Composing in Future
With this approach, Slick obtains a connection from the connection pool for each statement, so potentially multiple connections are used. Therefore, composing in Future should only be done if absolutely necessary. In the example below, we perform the same inserts as above. Note that here, it’s not possible to execute the two operations transactionally and a different database connection may be used for each operation. The only real reason to compose in Future would be in the unlikely case that you need to perform some non-Slick related operation in-between the database operations.

In conclusion, with Query resulting in a single SQL statement and DBIOAction resulting in a single connection, for optimal execution prefer Query over DBIOAction over Future.

Like all good things, Slick has some limitations – perhaps the biggest drawback is the lack of control you have over how Slick generates SQL queries from your Scala code. There are cases where Slick fails to generate the most optimal SQL and as a result the query performance will be worse than if you’d just written the SQL yourself. So when query performance is critical, there may be times where it is better to avoid Slick’s SQL generation functionality. Running Slick in debug mode enables you to see the SQL that is being executed, so if you hit a performance issue it is easy to find out whether Slick is the cause. Another limitation I came across is that some queries are currently not expressible with Slick’s Scala abstractions. For example, this fairly common SQL query cannot be expressed in the current release of Slick:

UPDATE table SET field = field + 123

This example is an exception, as the vast majority of common SQL queries can be expressed very easily. The library is still undergoing rapid development, so issues like these are becoming increasingly less common. In cases where it is not possible to correctly express the operation you want to perform using Slick’s abstractions, you can always use Slick’s plain SQL API.

Cross Datacenter Mirroring with Kafka

Having recently began working for one of Europe’s leading online ad-tech providers, I have been involved in the configuration of a new high-load Kafka cluster with the aim of handling up to 300K messages/second. It really is a high-load requirement – as even LinkedIn, the original developers of Kafka are processing a lower volume, at around 100K messages/second.

One of the choices we faced in setting up the new cluster was centered around how to publish messages from various datacenters around the world. We could either publish to a single Kafka cluster, located in our main datacenter, or we could have a separate Kafka cluster in each region. The network connection between datacenters is slow and potentially unreliable, so it didn’t make sense to publish to a single Kafka cluster from anywhere in the world as there would be a considerable risk of data-loss. For this reason, we wanted to have a separate, local Kafka cluster within each region, but ultimately would need all data to be pushed to our main cluster. In fact, Kafka ships with a tool designed specifically for this purpose – to replicate Kafka topics from one cluster to another. Note that this is not the usual subject of replication in relation to Kafka, which refers to maintaining replicas of Kafka topics within a single cluster for fault-tolerance.

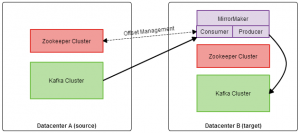
The MirrorMaker tool consists of a consumer and producer. For fault tolerance, multiple MirrorMaker processes can be fired up for the same mirroring task, within the same consumer group. If one fails, consumer re-balancing will take place as usual. The diagram below shows the full picture.

Mirroring data between two Kafka clusters

Starting a MirrorMaker process is simple; run the following command from the Kafka installation directory:

bin/kafka-run-class.sh kafka.tools.MirrorMaker --consumer.config config/consumer_source_cluster.properties --producer.config config/producer_target_cluster.properties --whitelist mytopic --num.producers 2 --num.streams 4

Here, the number of consumer and producer threads are specified by the num.streams and num.producers parameters respectively. One thing worth mentioning here is that the topic list parameter accepts a string in the format of a Java regex, so it’s possible to specify topic names with wildcards.

Confirming that the MirrorMaker is keeping up with the volume of messages in the source cluster’s topics can be done by running the built in offset checker and checking that the offset lag for each partition is not growing indefinitely:

bin/kafka-run-class.sh kafka.tools.ConsumerOffsetChecker --zkconnect zookeeperhost:2181 --group mirrormaker

There is a possibility of data loss when using the MirrorMaker – in the case where the producer is unable to produce messages and the consumer is still able to consume. This could occur if there were a network outage which only affected the producer. In this scenario, the consumer will continue to consume messages and commit offsets. This will likely be for a short period of time as the MirrorMaker exits upon an exception in either the consumer or producer threads, but those messages consumed and not produced are lost. There is a plan to address this issue which has been accepted for the next Kafka release.

There are a few settings that can be tweaked, such as the number of consumer and producer threads, the number of MirrorMaker processes and the properties for both the consumer and producer. In the producer properties, the queue.enqueue.timeout.ms should be set to -1 to cause the producer to block indefinitely if its queue queue is full – this can help to prevent data loss in the scenario described above. I ran some tests to investigate how the configuration affects the mirroring throughput. In these tests, the MirrorMaker processes ran in the target datacenter – which seems a sensible choice given the data-loss scenario. Failure between consuming and producing should be less likely if the cross-datacenter network transfer has already taken place before producing takes place. Here were the results:

Processes Consumer Threads Producer Threads Maximum Throughput
1 6 2 6 MB/s
1 12 2 10 MB/s
1 18 2 10 MB/s
2 12 2 14 MB/s
2 12 4 19 MB/s
3 12 6 24 MB/s
3 12 8 29 MB/s

In this investigation, the source topic had 12 partitions and we found that for maximum parallelism, the total number of consumer threads across all mirroring processes should add up to the total number of partitions. Since partitions are the unit of parallelism in Kafka, this rule applies to any type of Kafka consumer. We found that if the number of producer threads too low, this can be a bottleneck – this is shown by the difference in throughput between the fourth and fifth tests. We can also see that throughput scales fairly linearly with the number of MirrorMaker processes and consumer threads.

In conclusion, the MirrorMaker tool is a convenient solution to dealing with multiple Kafka clusters in different physical locations, when you want all data to be mirrored to a ‘main’ Kafka cluster. The number of MirrorMaker processes should be high enough to handle failure and the number of consumer and producer threads within these processes can be tweaked to achieve a target throughput. There is a data-loss scenario in the current version of MirrorMaker, but the probability of data-loss can be minimised by running MirrorMaker in the target datacenter.

Building a Search Engine for E-Commerce with Elasticsearch

This is a continuation of my previous post on search engines. Having been involved with using Elasticsearch to build a search engine for e-commerce, there are some interesting ideas which I have taken away from the experience. I will go through some of the design decisions made and problems encountered along the way.

Tweaking the Search Query
Elasticsearch provides a huge variety of different query types, each of which has a different approach to retrieving search results. For example, the term query will find documents containing a certain term, the fuzzy query will match documents containing terms which are approximately equal to a given term, the geo-shape query enables you to perform useful queries over documents containing longitude and latitude coordinates and many more. Any of these query types can be composed using compositional query types, such as the bool query.

When I talk about tweaking the search query, I mean choosing the query types to use and structuring our query in a way that will enable us to achieve optimal results for any kind of search over the product base. The two main properties of the search query which we are trying to optimise are:

  1. How to best determine which products match
  2. How to best determine the order (i.e. relative importance) of the matching products

One of the first options that we considered using was the query-string query: a query type that parses your query and decides what query types to use, and often does the sensible thing. For instance, jeans will match any document containing the term jeans, blue jeans will match any document containing both ‘blue’ and ‘jeans’ and "blue jeans" will match documents containing both terms together (an exact match). You can even make more complex searches, like blue jeans -(levi OR diesel) which will match documents containing ‘blue’ and ‘jeans’ but not the terms ‘levi’ or ‘diesel’. This all seems quite nice at first, but this query type can give very unexpected results if used incorrectly – for example t-shirt will match documents containing ‘t’, but will exclude all documents containing ‘shirt’. Of course, customers can’t be expected to understand why this happens or how to fix their query.

Another option is the multi-match query, which takes a list of fields to query over and builds a sequence of match queries. Similar to the query-string query, each field can each be given a different boost factor, which is used in determining relative importance of some terms matching a given field. You can also tweak the type of multi_match – e.g. whether the query terms must all be found in a single field, or can be found in different fields (but not necessarily in the same field). Here is an example of a multi_match query:

{
  "multi_match" : {
    "query":      "gladiator russell crowe",
    "type":       "best_fields",
    "fields":     [ "title^10", "actors^5", "description^1" ]
  }
}

Here, we have used the boost operator (^) to indicate that the title field should be given the most importance. The query will still be matched against the description field, but matches in the title and actors fields will be given a higher score and will appear first in our result set. The best_fields type gives precedence when the query terms appear in the same field, but they don’t have to.

When matching across multiple fields, it can be tricky to figure out which documents are most relevant to the query. If we just consider which fields matched the query, then we won’t get optimal results. For example, if the query is ps4 controller and a document contains ‘ps4’ in the title field and ‘controller’ in the description field, then should it be given a higher score than a document which contains both terms in the title field but neither in the description field? The first document has more matching fields, but intuitively, the second document should surely be considered a more relevant result. Elasticsearch provides a solution to this: the disjunction-max (dis-max) query. This enables us to perform sub-queries over multiple fields and take the score of the best matching field (i.e. the maximum scoring sub-query), instead of summing the scores from each matching sub-query. In practice, this often yields better results and is in fact the default behaviour for the multi-match query.

We used the multi-match query successfully in production for quite some time, but ultimately decided to switch to using the common terms query. This is an interesting query type which provides not only a way to determine stop words dynamically, but also a way to not completely disregard stop words at search time. When using the multi-match query, we assigned a stop word filter to each field in our mapping, which uses a pre-defined list of stop words to remove the most common and semantically useless words from the index. This is usually good because those words don’t add much meaning and make searching the index slower. But is this always a good thing? Consider the video game ‘The Last Of Us’. A search for the last of us would result in all products containing the term ‘last’ and those products would not be ordered very sensibly, since the other three terms (all stop words) would have been thrown away. In this scenario, the common terms query is much more effective. Instead of removing stop words, it uses term frequencies across the whole index to determine which terms are important and which occur frequently enough to be considered stop words. In this example, ‘last’ would likely be deemed an important term, while ‘the’, ‘of’ and ‘us’ would be deemed less important. The common terms query then splits searching into two steps:

  1. Use the important terms to determine the result set
  2. Use the less important terms to order the result set

This way, stop words are not completely thrown away, but they are not considered until after the product result set has been determined. This fits very nicely with the two search query properties we are trying to optimise towards. To keep the cross-field search benefits of the multi-match, the common terms query can be wrapped inside a dis-max and have a boost factor applied to each field:

{
  "dis_max" : {
    "tie_breaker" : 0.3,
    "queries" : [
      {
       "common": {
          "title": {
          "query": "the last of us",
          "boost": 10,
          "cutoff_frequency": 0.001
          }
       }
      },
      {
        "common": {
          "studio": {
          "query": "the last of us",
          "boost": 3,
          "cutoff_frequency": 0.001
          }
        }
      },
      {
        "common": {
          "description": {
          "query": "the last of us",
          "boost": 1,
          "cutoff_frequency": 0.001
          }
        }
      }
    ]
  }
}

With this query, we saw an uplift in product page visits from search and more customers were clicking products returned in the first two rows of their search results. This demonstrates that our use of the common terms query was enabling customers to find the most relevant products more easily.

Customising the Score Function
As we’ve seen, Elasticsearch provides us with many clever ways to score search results such that the most relevant products appear first. But in e-commerce, there are some factors that are worth considering outside of how relevant the product itself is. This includes things like:

  • How popular is the product?
  • Is the product in stock?
  • Was the product released recently?
  • How profitable are sales of the product?

For example, if a product is extremely popular at the moment, then perhaps it should be boosted above other search results. Or, if a product is out of stock, we probably don’t want to show it in the first few search results.

To factor in this information, we can design our own scoring function which will adjust the scores computed by our Elasticsearch query. This is done by wrapping the main search query in a custom_score query. We can then provide a script which modifies the original score (denoted by _score) by using fields from the index and a set of parameters. This way, we could index a field such as ‘product_popularity’ into our product documents, and then boost the _score for more popular products. We would make it possible to assign different levels of importance to each factor with an adjustable weighting for each parameter. Normalisation is also important to ensure we operate on the same scale for each factor. Here’s an example of this with just the product popularity factor:

"custom_score": {
    "params": {
        "scoreWeighting": 2,
        "popularityWeighting": 5,
        "maxPopularity": x
    },
    "query": {...},
    "script": "scoreWeighting * _score + (popularityWeighting * (doc['popularity'].value / maxPopularity))"
}

In practice, our score function considers a lot more than the product popularity and is dynamically generated by the search service using a set of configurable parameters which can be changed at any time without a redeployment.

Achieving Faceted Search
Faceted search is a way of enhancing the search experience by enabling the user to navigate their search results by applying a set of filters. Faceted navigation is now seen on the majority of online retail sites and probably looks very familiar to you:

An example of faceted search

A facet is a set of filters. In the above example, there are three facets: category, sub-category and price. Sometimes, more complex faceting may be desirable – for instance, you might want it so when you apply the ‘DVD’ category filter, you are then given a choice of movie genres to filter by. This is called a nested facet, as it is a facet within a facet.

With Elasticsearch, it is fairly painless to set up faceted search. First, you will need to have in your mapping a non-analysed version of each field you want to facet on:

{
    "category": {
        "type":     "string",
        "index":    "not_analyzed"
    }
}

We use the not_analyzed setting because at index time we want the field to be mapped as an exact field, so that later, the filter options (in this case categories) will appear exactly as they were indexed.

Now, at query time, we can append a terms aggregation to our query:

{
    "aggs" : {
        "categories" : {
            "terms" : { "field" : "category" }
        }
    }
}

Our response will now contain all the information we need about categories for the given query. Elasticsearch will give us a breakdown of counts for each type of category within the result set for our query:

 "aggregations" : {
        "categories" : {
            "doc_count_error_upper_bound": 0, 
            "sum_other_doc_count": 0, 
            "buckets" : [ 
                {
                    "key" : "Merchandise",
                    "doc_count" : 856
                },
                {
                    "key" : "Clothing",
                    "doc_count" : 455
                },
                ... etc ...
            ]
        }
    }
}

Now, when a user clicks on a category, such as Clothing, we usually want our search results to be filtered to display only clothing, however the facet counts for categories should remain unchanged – the Merchandise facet count should still be 856. To achieve this, we can use Elasticsearch filters instead of extending the query. In this example, we would append a terms filter on the category field, with the term ‘Clothing’. This will achieve the behaviour we want because filters are not considered when computing the facet counts – the search results will be filtered, but the facet counts will remain unchanged.

Implementing Instant Search
Instant search is where the search engines assists you with your search while you type. There are several variants of this:

  1. Displaying products relevant to what the customer has typed so far
  2. Displaying search suggestions – predicting what the customer is going to type next (AKA auto-complete)
  3. Detecting spelling mistakes and suggesting corrections

It is actually possible to achieve all of the above with a single Elasticsearch query! We achieved this by using an n-grams analyzer for auto-complete, a shingle analyzer for search suggestions and Elasticsearch’s in-built term and phrase suggester for spelling correction. Check out my colleague’s post here for a complete example of how to achieve this.

Handling Distributed Search
Elasticsearch is an excellent example of a sophisticated distributed system which hides much of the inherent complexity from the user. Behind the scenes, problems like partitioning documents into shards, balancing shards across the cluster, replicating data to maintain fault-tolerance and efficiently routing requests between nodes are handled. All you have to do is configure a couple of settings in your elasticsearch.yaml – such as the number of shards to split each index into and the number of replicas to keep of each shard.

While configuring distributed search is pretty easy, there are some more complex issues which should be addressed. One of these issues is: how can we make a change to our mapping (i.e. the index) without causing any downtime to our search engine. For an e-commerce company, any form of downtime translates directly to a loss in revenue, and with our large product base, re-populating the search indices is a lengthy process which takes several hours. This problem can be solved using index aliases – an Elasticsearch feature which enables us to set up something similar to a symbolic link – an index alias which always points to a live and fully prepared index. For example, we can set up an alias, products which points to a specific version of our products index:

PUT /products_v1/_alias/products

Now, we can make a change to our mapping and populate a new index, products_v2, wait until we are satisfied that all data has been indexed and shards balanced, before finally switching our alias to point to the new index.

There are some problems that come with the distributed nature of Elasticsearch. Imagine performing a search, getting 10 search results in the response, then refreshing the page and seeing 50 search results. How can search be non-deterministic?! Well, this is a problem that we encountered. This problem comes about as a result of Elasticsearch making optimisations and using approximate term frequencies to determine results. Each shard has a subset of documents in the index, and by default, Elasticsearch will use the shard’s term frequencies as an approximation for the actual term frequencies. When using the common terms query as described earlier, a term may fall under the threshold for being considered a stop word on one shard, but may be over the threshold on another shard. So, depending on which node a query gets routed to, we can end up with different results. Most of the time, this isn’t a problem as term frequencies should be very similar across all shards, providing there is enough data and the data is evenly distributed. But, if it does become a problem, full accuracy can be achieved by changing the default query type to dfs_query_and_fetch, by appending &search_type=dfs_query_then_fetch to the search URI. This query type performs an additional round-trip, collecting term frequencies from all nodes and calculating a global term frequency, before sending the query to all shards and computing results using the global frequencies. This ensures results are always accurate, but comes at the cost of some additional latency.

A similar problem can be seen in faceting. Facet counts are computed on each shard and then aggregated on the node designated as coordinator. If, say, our request is for the top 10 terms within a facet, then each node will return it’s locally computed top 10 facet elements. In cases where there are more than 10 terms, accuracy can be lost. To address this problem, a recent version of Elasticsearch introduced a shard_size attributed which can be set on the facet query, and specifies the number of elements each shard should return. This is separate from the size attribute – i.e. the number of elements we actually want. Asking each shard to return more elements is of course more expensive, but will give higher accuracy when it is needed.

Conclusions

  • It is hard to find a query which works well for every search. If there is a particular search found to yield bad results, it can be easy to optimise towards improving and fixing that search, but then other searches end up suffering as a result. When making changes to the search query, always think: will this work well for both general searches and specific searches?
  • Use filters for faceting, to filter search results without affecting facet counts. Also, Elasticsearch filters are (by default) cached, so can boost performance.
  • The three types of instant search: product suggestions, search suggestions and spelling corrections can be achieved with a single Elasticsearch query – providing the title field is configured with both a shingles and n-grams analyzer.
  • You should always A/B test whenever you make a change to the search experience. It can be invaluable to have good reporting on things like ‘searches which yield no results’ to easily catch problem with changes to the query.
  • Use index aliases to make large changes while maintaining zero-downtime.
  • There can be non-deterministic results with a distributed search engine, but with Elasticsearch these problems can be resolved at the cost of additional latency.
  • The search experience makes a big difference. It not only enables customers to discover the products they are looking for, but a well-tuned search experience can also can help them discover things they weren’t explicitly searching for. We saw significant boosts in revenue from search every time we made improvements to the search engine.

What Makes Search Engines Special?

Having spent over six months working as part of a small team to design and build a new search engine for one of Europe’s largest online retailers, I found myself learning a lot about the inner workings of modern search engines. It was my first real exposure to search – a technology which is really central to everyone’s online experiences.

Search is more complex than it may seem at first. An e-commerce search engine is built to enable customers to find the products that they are looking for. A customer will search for a product, perhaps by name, and the search engine will check the database of products and return those that match the search query. Perhaps you could write a search engine with a simple SQL query:

This may seem to yield decent results for some search queries – but there are many problems with such an approach.

  • Exact substring matches only. A search for ‘matrix dvd’ won’t match ‘The Matrix (1999) – DVD’.
  • No way to order the results. What if the query is ‘xbox’ and 100 products have ‘xbox’ in their title? Xbox games, xbox accessories and xbox’s themselves. Our query will find these products, but we have no way to order our results based on the most relevant matches.
  • Only searching a single field. What if we want to enable our customers to search for authors, directors, brands etc? Sure, we could change our query to look in multiple fields, but surely those fields shouldn’t be given the same importance as the product title, right?
  • No support for synonyms. A search for ‘football’ won’t match any products with ‘soccer’ in their title.
  • No stop word filtering. These are common words like ‘and’, ‘the’ and ‘of’. These words are usually not important in a search, especially in determining which products match a query. When we are searching just on product title, the negative effect of stop words is not so noticeable. But imagine if we want to extend our search engine to search over a larger body of text, such as a product description. In this case, most of the products in our database will contain stop words in the description, and it certainly doesn’t mean they should match the query.
  • No stemming. This is the process of truncating a word to its simplest form, in order to extract its root meaning. For example, ‘fisher’, ‘fishing’ and ‘fished’ all have similar meanings. These words could all be stemmed to ‘fish’, so that a search for any one of these terms will match all products related to fish.
  • Term frequencies are not considered. The frequency of a term in the corpus (i.e. across the entire database of products) can actually give us a lot of information about how important each term in a query is. If you consider a search for ‘game of thrones’. There are three terms in this query, one of which is a stop word. Now imagine that we are a game retailer and all of our products are games. Many of the products in our database will match the term ‘game’ while only a few will match the term ‘thrones’. This is because the term frequency for ‘game’ across our entire database is a lot higher than it is for ‘thrones’. With this knowledge, we know that ‘thrones’ is the more important term – products which match this word are more relevant.
  • Typical SQL databases won’t scale. As our product base and the volume of queries per second grows, standard databases will quickly become slow – partly because they are not designed for full-text search, where we are searching bodies of text for partial matches.

All of these problems can be solved with ideas which have been developed in the field of information retrieval. There are two key concepts which give modern day search engines their speed and quality:

  1. Indexing – An index is a data structure which enables us to perform blazingly fast searches within our database for documents which match a query (in the e-commerce case, a document corresponds to some information describing a product). Without an index, we would have to look in every document and compare every term with our query – a slow and inefficient process. Every document that we want to be able to search over is indexed. To index a document, every field of the document is broken down into a set of tokens and these tokens are added to the index. This process is called tokenization. The way tokens are extracted will vary depending on what we want to achieve, but tokens are often stemmed words, with stop words omitted. Using our earlier example, if a document contains the word ‘fishing’, then perhaps the (stemmed) token ‘fish’ would be added to our index.
  2. Relevance Scoring – When executing a search query, the first step is to find all documents which match the query using our index. However, having found these documents, a search engine needs to give each document a score based on how well it matches the query – so that the most relevant results appear first in your search results. There are multiple ways to do relevancy scoring, but one of the most common ways is known as TF/IDF (term frequency – inverse document frequency). The idea is that, if a term from the query appears more times in a document, then that document should receive a higher score. But, if that term appears many times in our corpus (i.e. it is a more common term), then the document should receive a lower score. Combining these two ideas, we can do some linear algebra to find the most similar documents to our query. For a detailed explanation of this, check out this article.

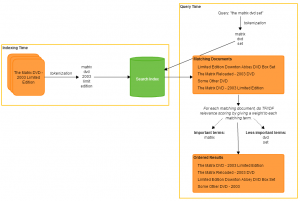
In the diagram below I have tried my best to depict the processes of indexing (at index time) and document retrieval (at query time).

The processes of indexing and retrieval in a typical search engine.


Today, two of the most widely used general purpose search frameworks are Apache Solr and Elasticsearch. Both are distributed search engines written on top of Apache Lucene, a high performance full-text search library which provides implementations of the above concepts. Solr is extremely mature and has long been the industry standard, but in the last few years Elasticsearch has received a lot of attention for a number of reasons: it is based on more modern principles, it is designed to deal with very large amounts of data and without the legacy constraints of Solr, the development community were able to make very rapid progress. In our case, (with our desire to always use the latest technologies) we decided to go with Elasticsearch.

In my next post, I will discuss some ideas, best practices and lessons learned from using Elasticsearch to build a search engine for e-commerce.


Writing a Query Parser for Elasticsearch

I was first exposed to parsers when studying compilers at university – I built something that could take a program written in a fictional programming language as input and produce runnable assembly code as output. It was interesting and fun, but I doubted I would ever use the knowledge in industry. When the need came up for a ‘language’ that non-technical people could use to construct Elasticsearch queries, I realised that a custom built parser would be the ideal solution.

We were using Elasticsearch to power our sites’ search functionality and product list pages. The list pages would be created by non-technical site managers and to avoid the inflexibility of manually specifying a list of product IDs we wanted them to instead be able to write a search query which would result in the list page being built dynamically. For example, a list page for mens shampoos and conditioners which have been reduced to half price or less might be represented by the below ‘list definition’, which describes how to query the product index:

content_gender:male AND content_category:(shampoo OR conditioner) AND price_discount_multiplier: [0 TO 0.5]

Elasticsearch actually has a query type, called the query string query, which uses a built-in query parser to build queries from a simple language with very similar structure to the above. However, we had some very specific requirements, such as being able to elevate certain products under certain conditions (i.e. enabling the list to have some manual ordering which may override the ordering of the results returned by the search engine). So, it became clear that we would need to invent our own query parser.

There are a number of frameworks available for building parsers. Two popular choices are ANTLR and JavaCC (Java Compiler Compiler). ANTLR has been around for a long time and provides the most features – it is especially appropriate for more complex tasks such as building an actual program compiler. JavaCC is simpler and, as its name implies, targets the Java language and provides the most familiarity for Java developers. Since the systems powering our websites are written in Java, JavaCC seemed like the right choice.

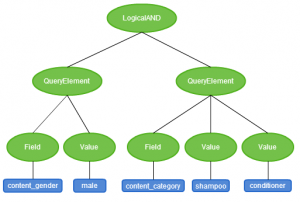
The first step in building a parser is to write a grammar. A grammar defines the syntax of our language and is used for syntax analysis; in our case this involves going through a list definition, ensuring that it syntactically makes sense and simultaneously building a data structure which we can later use to generate an Elasticsearch query. For our language, the data structure that we want to build is called an abstract syntax tree (AST) – a tree representation of our syntax. For example, the syntax tree for the list definition content_gender:male AND content_category:(shampoo OR conditioner) would look like this:

An example of a generated syntax tree

To build this tree, we can use JJTree, an extension for JavaCC which will build the AST data structure for us, and will enable us to describe how the tree should be built within our grammar. The grammar itself is fairly straightforward to write, once you get used to the syntax. Firstly, we define all the tokens (i.e. strings) which we want our parser to be able to consume:

TOKEN :
{
    < AND : "AND" >
  | < OR : "OR" >
  | < LBRACKET : "(" >
  | < RBRACKET : ")" >
  | < COLON : ":" >
  | < WORD : ["a"-"z", "*", "_"]* >
... etc
} 

Next, we define the parsing rules, which describe how the parser should consume these tokens and how the AST should be built. JJTree extends the grammar syntax so that we can use #NodeName to indicate that a node should be added to the syntax tree whenever the parser consumes the corresponding tokens. Below is a simplified example of what the rules will look like. These rules will support a language which consists of the AND and OR logical operators and grouping with brackets. Note that the rules are recursive: a query consists of sub queries, which can consist of more queries. We can also extract tokens such as the field names and values and store them as in the generated syntax tree. This is done by assigning the token value to a field defined within the node.

 ASTQuery query() #Query:
{
  Token t;
} 
{
  subQuery()
  (
    < AND > subQuery() #LogicalAnd(2)
  | < OR > subQuery() #LogicalOr(2)
  )*
  {
	return jjtThis;
  }
}

void subQuery() #void:
{
  boolean not = false;
} 
{
  < LBRACKET >query()< RBRACKET >
  | queryElement()
}

void queryElement() #QueryElement:
{}
{
  (
  LOOKAHEAD(2) field() < COLON > ( value() | valueList() )
  | vstring()
  )
}

void field() #Field:
{
  Token t;
}
{
	t = < WORD >
	{
		jjtThis.value = t.image;
	}
}

void valueList() #void:
{}
{
	< LBRACKET > value() (< OR > value())* < RBRACKET >
}

void value() #Value:
{
  Token t;
}
{
  (
    < QUOTE >t=< STRING >< ENDQUOTE >
    | t=< WORD >
  )
  {
    jjtThis.value = t.image;
  } 
}

Having defined the rules, we can use JavaCC to generate classes for each node and compile our parser which will do all the work needed to convert list definitions written in our language into syntax trees. Now comes the interesting part – turning these syntax trees into Elasticsearch queries which can be ran against our index. To do this, we need to traverse the abstract syntax tree and construct a query. For traversal, JJTree provides support for the visitor design pattern. For building the query, we can use the Elasticsearch Java API.

To use the visitor pattern, we must ensure that the JJTree option VISITOR=true is set. This flag causes JJTree to generate a visitor interface which we can implement, and also adds a jjtAccept() method to the generated node classes. We can then write a visitor class which implements the generated interface. For each node, we implement visit method which describes how to behave when we encounter each specific type of node. For example, when we reach a LogicalAND node, we can use the Elasticsearch Java API to create an AndFilterBuilder, and populate it with filters retrieved from the child nodes. We can retrieve these filters by calling the accept methods on the node’s children. At each level in the tree, we return an Elasticsearch query or filter object to the caller which can be composed into other queries further up the tree.

Here’s an example of what the visit methods could look like for the Query (root), LogicalAnd and QueryElement nodes:

To test this, we can just use the parser to generate a tree and pass an instance of our visitor class to the root node to generate a query.

That’s it! We now have a parser that can take input written in our custom-built query definition language, turn valid syntax into a syntax tree and finally build an Elasticsearch query.

Real-Time Analytics with Elasticsearch

When you are running a website used by thousands of people, it should go without saying that very valuable data can be collected about your users and they way they interact with your site. This usually comes in the form of click-stream data – which is effectively logs written by your webserver on every interaction (or click) made by a user who is navigating your site. An e-retailer can use this data for a many purposes, for example: analysing how users interact with the site and what causes them to place an order, monitoring the performance of a new advertising campaign, seeing how users respond to a new feature and detecting problems such as pages which result in an error 404. For many of these purposes, raw data can be crunched through a batch processing system such as Hadoop, but for some purposes it is beneficial have real-time information and statistics about how users are interacting with the site right now.

Imagine you are in e-retailer in the process of rolling out a brand new feature, such an improved search engine. As soon as this feature goes live, it will have an immediate impact on the user experience and the products people are interacting with. It may even change the way people search and the terms they search for. Having real-time statistics such as the number of page views, searches, product visits from searches and product orders from searches gives confidence that the new experience is having a positive impact, or at least not causing any serious problems. This article discusses our experience with building a data store to persist and query over click-stream data in real-time.

For the backing datastore of our analytics framework there were a huge number of possible solutions. We began by considering SQL, but as we are dealing with millions of click-stream events every day SQL can quickly become an expensive and not-so-scalable option. Ultimately we made a choice between MongoDB and Elasticsearch. Both are open source, distributed NoSQL document stores – Elasticsearch is built on top of Apache Lucene (a high performance JVM based search engine) and MongoDB is written entirely in C++. Elasticsearch provides a very clean and compact RESTful API which enables you to use JSON over HTTP to specify your configuration, index documents and perform queries. We found that the query API provided by Elasticsearch provides considerably more flexibility when it comes to faceting and search. An example of this is when you want to calculate a count, total or average and see how it changes over time. For instance, if we want to count the number of searches performed on our site by hour, the date histogram facet makes this easy. The following Elasticsearch query will return a set of key value pairs for each site, where the key is an hourly timestamp and the value is a count of search events:

{
  "query": {
    "match": {
      "eventType": "search"
    }
  },
  "facets": {
    "siteId": {
      "date_histogram": {
        "field": "timestamp",
        "interval": "hour"
      }
    }
  }
}

Doing this kind of aggregation with MongoDB is of course possible, but we found these queries are simply quicker and easier to write with Elasticsearch. Plus the API makes it very easy to query the store with a REST client. Of course there are advantages to using MongoDB – for instance at the time of writing there is far more documentation available, MongoDB provides more flexibility as the document structure can be changed at any time and also MongoDB is particularly good at facilitating backup and recovery. Since we were not looking for a primary data store, these advantages didn’t outweigh Elasticsearch’s cleaner API.

One of the first decisions to make when using Elasticsearch is how to structure your indices. In our case, we wanted to capture several different types of events, each of which would have different associated attributes. Page visits, searches, basket adds among other events are all logged by our web servers in real-time. This data then needs to be sent to Elasticsearch and indexed. We decided to use time-based Elasticsearch indices. This means that every day, a new index is created and all data for that day is stored within that index. The index name takes the format ‘EVENT_TYPE-YYYYMMDD’. There are a few advantages to doing this:

  • It’s easy to query over only the events and days we want. Elasticsearch supports wildcards matching for the index name – so if we send a query to ‘searches-201401*’ our query will be executed over all the search events which took place in January.
  • When we want to delete old data, we simply need to delete old indices. Clearing out old data can then be done easily and automatically using a daily cron job. No need to use time-based indices, which could add significant overhead.
  • Routing and sharding can be configured on a per index basis. This makes it possible for us to configure which servers should handle which days. For example, if a server is running out of disk space, we can just configure shards for future indices to avoid that server.
  • Using Elasticsearch templates, we can configure a mapping and settings which are automatically applied to new indices. For example, any index created with a name matching ‘searches-*’ will have a specific mapping and settings applied to it.

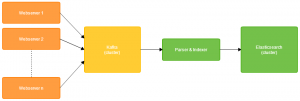
With a good idea of how the data store would be structured, the next step was to get data from our web logs into Elasticsearch, in real-time. This process involves aggregating log files, and then parsing and indexing the log events into Elasticsearch documents. We developed a Java application to serve this purpose – sending bulk updates to our Elasticsearch cluster every few seconds. The simplified data pipeline is pictured below, although we have since replaced log aggregation with Kafka, a distributed messaging framework.

The flow of data from web servers to Elasticsearch

We soon encountered some difficulties when writing queries over our data. One of the biggest difficulties comes when running queries over multiple indices. Each of our event types has different attributes, for example: search terms and search engine information appear on search events, but not on product visit events. What if we want to count the number of product visits resulting from searches for the term ‘xbox’? Well, we want to perform a ‘join’ operation, something which would be quite easy to achieve in SQL:

SELECT * FROM product_visits p INNER JOIN searches s ON (p.userId = s.userId) WHERE p.referrer_url = s.url AND s.term = 'xbox'

With Elasticsearch, things are not so simple. We can easily query several indices at once, but how can we specify that we want to find all product visit documents which have a matching search document?

Solution 1: Use parent child relationships
Elasticsearch enables us to specify a parent child relationship between document types. For instance, we could have two types of document: product_interaction documents (which contain event types product_visit and product_order) and cause documents (which contain event types like search). We could then configure a parent-child relationship between causes and product_interactions, such that each product_interaction is the child of a single cause. This structure enables us to use the built in ‘has_parent’ query to find all product visits that resulted from a specific search:

POST searches-201401*/_search

{
  "query": {
    "has_parent": {
      "parent_type": "cause",
      "query": {
        "match": {
          "searchTerm": "xbox"
        }
      }
    }
  }
}

This solution is flexible. The two document types are completely independent of each other – if we want, we can update one without affecting the other. To aid performance, Elasticsearch ensures that children are physically stored in the same shard as their parent. However there is still a performance cost to using the parent child relation and we found that our query speed sometimes suffered. There is also a big limitation to this design – there is no support for more complex relationships, such as grandparent->parent->child. So, we would be unable to add further relationships (e.g. between product_orders and product_interactions) and model the full chain of events.

Solution 2: Add extra information at indexing time
Our end solution which solves both of the above problems is simply to move the logic surrounding relationships into the application layer. State corresponding to recent user activity (for example, searches in the last ten minutes) are stored in memory in our indexing application. Then, when product visit events are received, the in-memory state is checked and the ’cause’ of the product visit can be found. Then, when indexing the product visit document, extra attributes are indexed within the document such as the search terms which led to the product being visited. If we want to track more events in the train, such as product orders, then attributes that were added to the product visit document are copied into the product order document. This means that at query time, we don’t need to search over multiple document types and perform a join – all the information we need is contained in a single document type. This solution gives us very fast query performance at the cost of higher storage and memory requirements – since document size is greater and some information is duplicated.

With this setup, we are able to comfortably query over a month’s worth of data within just a couple of seconds – and that’s with a single node cluster. One problem we encountered is that it is possible to write incorrect or very computationally demanding queries and no matter how complex or demanding the query, Elasticsearch will attempt the computation. If it does not have sufficient resources to complete the query it will fail with an OutOfMemory error and the only way to recover from this is to restart Elasticsearch on the failed node(s). Aside from this, our experience with Elasticsearch for near real-time analytics has been very positive.